Novra S400 Receiver
The Novra S400 is a standalone receiver. It receives a satellite signal fed via its coaxial interface and outputs IP packets to one or multiple hosts listening to it in the local network. This page explains how to configure both the Novra S400 modem and the host(s) of interest.
Table of Contents
- Connections
- Network Connection
- Software Requirements
- Receiver and Host Configuration
- Monitoring
- Next Steps
- Further Information
Connections
The Novra S400 can be connected as follows:

- Connect the LNB directly to interface RF1 of the S400 using a coaxial cable (preferably an RG6 cable).
- Connect the S400’s LAN1 interface to your computer or network.
Network Connection
Next, make sure the S400 receiver is reachable by the host.
First, configure your host’s network interface to the same subnet as the S400. By default, the S400 is configured with IP address 192.168.1.2 on interface LAN1 and 192.168.2.2 on LAN2. Hence, if you connect to LAN1, make sure your host’s network interface has IP address 192.168.1.x, where “x” could be any number higher than 2. For example, you could configure your host’s network interface with IP address 192.168.1.3.
After that, open the browser and access 192.168.1.2 (or 192.168.2.2 if connected to LAN 2). The web management console should open up successfully.
Software Requirements
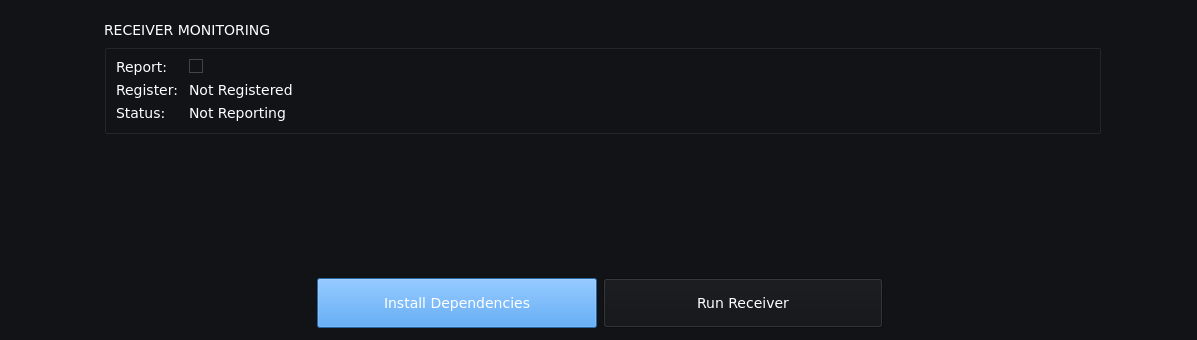
Next, ensure all software prerequisites are installed on your host. If using the GUI, in case some dependencies are missing, click on the “Install Dependencies” button on the Receiver tab, as shown below. If you cannot see the button, all dependencies are already installed correctly.
If using the CLI, run the following command to ensure all dependencies are installed:
blocksat-cli deps install
Note: the installation supports the
apt,dnfandyumpackage managers.
Receiver and Host Configuration
Next, configure the Novra S400 receiver and the host. When using the GUI, the configuration starts automatically after clicking the “Run Receiver” button on the Receiver tab (see the screenshot above).
Alternatively, if using the CLI, run the following command:
blocksat-cli standalone cfg
If you would like to review the changes before applying them, append option
--dry-runto the command.
Also, if you would like to apply the receiver configurations manually, refer to the instructions for configuration via the web UI.
Note: the above commands assume the S400 has IP address
192.168.1.2(the default address). You can specify another address on allblocksat-cli standalonecommands by running with option--addr [address].
Monitoring
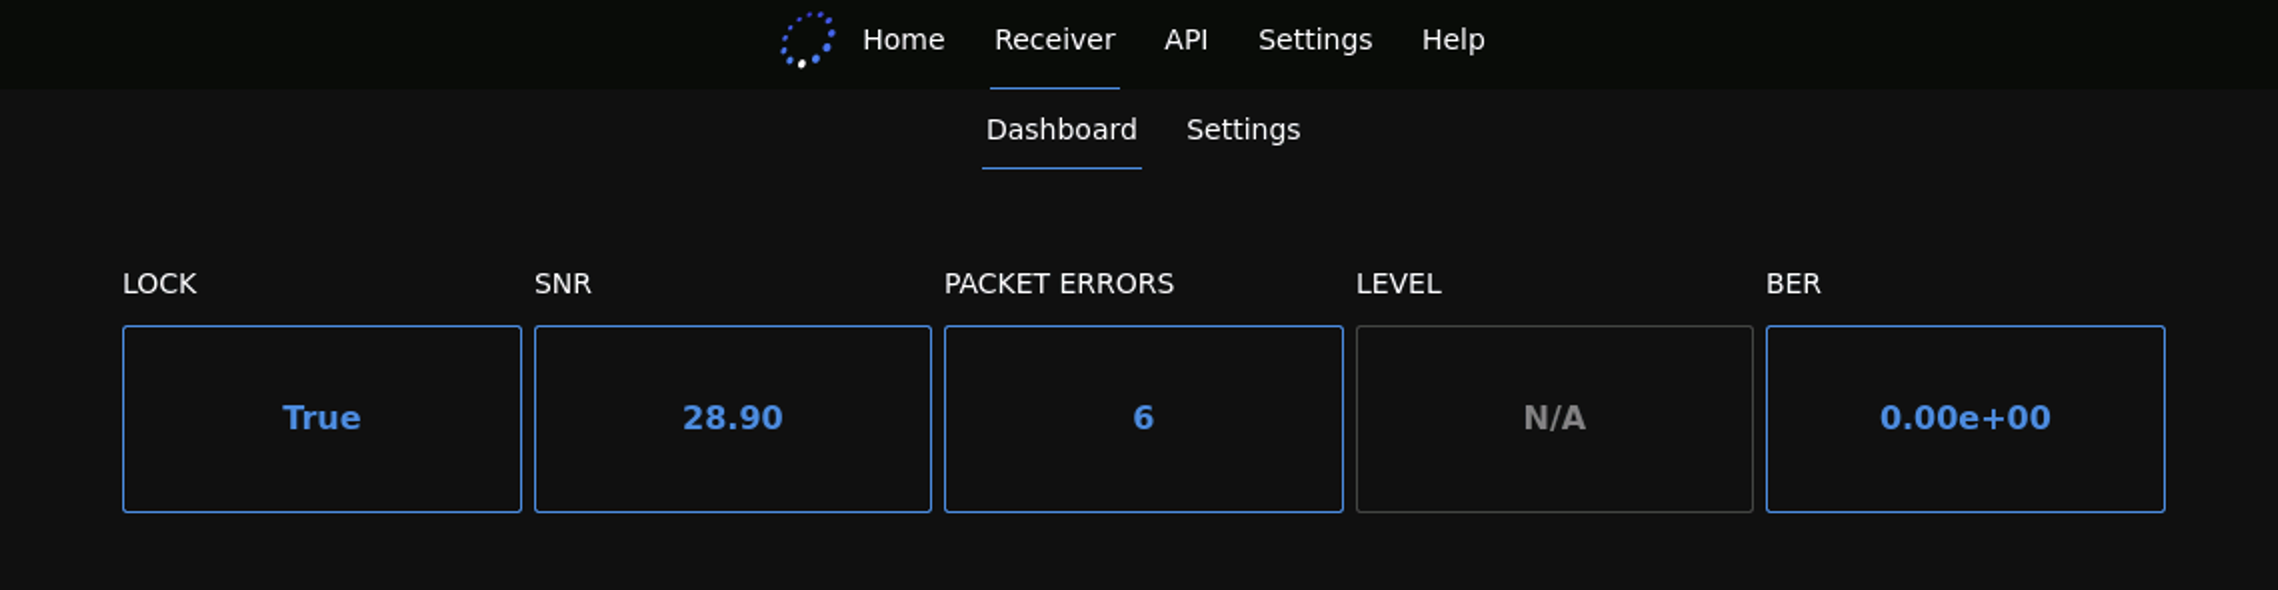
Finally, you can monitor your receiver in real time with the GUI. After starting the receiver, the Receiver tab shows the live status as follows:
If using the CLI, you can monitor the receiver by running:
blocksat-cli standalone monitor
Next Steps
At this point, if your dish is already correctly pointed, you should be able to start receiving data on Bitcoin Satellite. Please follow the instructions for Bitcoin Satellite configuration. If your antenna is not aligned yet, please follow the antenna alignment guide.
Further Information
Dual-satellite Setup
On a dual-satellite setup, you need to configure the two RF interfaces of the S400. After configuring the first interface as instructed earlier, configure the second by opening a second GUI instance or by running the following CLI command:
blocksat-cli --cfg rx2 standalone --demod 2 cfg --rx-only
Refer to further information on the dual-satellite setup guide.
S400 Configuration via the Web UI
-
Open the browser and access the IP address of the S400. By default, the address is
192.168.1.2if connected to LAN 1 and192.168.2.2if connected to LAN 2. - Log in as admin on the top right of the page.
- Default password:
password
- Default password:
- Check the signal parameters that apply to your setup. Run the following command and use the results in the next step.
blocksat-cli cfg show
- Go to
Interfaces > RF1and configure as follows:
- DVB Mode: “DVB-S2”
Next, configure the LNB parameters at the bottom of the page:
- LNB Power On: Enable.
- L.O. Frequency: your LNB’s local oscillator (LO) frequency in MHz.
- Polarization: the signal polarization (horizontal or vertical).
- Band (Tone): “Low/Off” by default. Set to “High/On” only when using a Universal LNB and receiving from Galaxy 18 (in Ku High Band).
- Long Line Compensation: Disabled.
After that, configure the DVB Signal Parameters:
- Carrier Freq.: frequency in MHz of the satellite covering your location.
- LBand: leave it with the auto-filled value.*
- Symbol Rate: 1.0 MBaud.
- MODCOD: AUTO.
- Gold Code: 0.
- Input Stream ID: 0.
* The L-band frequency is automatically defined once you inform both the L.O. Frequency and the Carrier Freq.
Then, click Apply.
- Verify that the S400 is locked.
- Check the “RF 1 Lock” indicator at the top of the page or the status LED in the S400’s front panel. It should be green (locked) if your antenna is already pointed correctly. If not, you can work on the antenna pointing afterward.
- Go to Services > RF1:
Scroll to “Manage MPE/ULE PIDs”:
- Enter 32 on “New PID” and click “Add”.
- Apply.
** Optional configurations:
- If you prefer to use another IP address on LAN1 or LAN2, go to Interfaces > Data (LAN1) or Interfaces > M&C (LAN2) and configure the IP addresses. Note LAN 1 is the interface that will deliver the data packets received over satellite, whereas LAN2 is optional and exclusively for management.
- If configuring the second RF interface on the S400 for a dual-satellite setup, on step 2, go to
Interfaces > RF2instead ofRF1. Correspondingly, on step 3, check the “RF 2 Lock” indicator, and on step 4, go toServices > RF2.
Prev: Receiver Setup - Next: Bitcoin Satellite or Antenna Pointing