Selfsat>IP22 Sat-IP Receiver
The Selfsat>IP22 is an all-in-one flat-panel antenna with an integrated DVB-S2 receiver and LNB. It is the basis of the Blockstream Satellite Base Station kit available on Blockstream Store. This device receives the satellite signal and outputs IP packets to one or more Sat-IP clients listening to it in the local network. This page explains how you can connect to the base station device to receive the Blockstream Satellite traffic.
Table of Contents
Connections
The integrated Sat-IP antenna-receiver can be connected as follows:

- Connect the Ethernet cable from your switch or computer’s network adapter directly to the antenna’s Sat>IP port.
- If your switch/adapter does not support Power over Ethernet (PoE), insert a PoE injector in-line between the switch/adapter and the antenna’s Sat-IP port. Connect the injector’s PoE-enabled port to the Sat-IP antenna and the non-powered (non-PoE) port to the switch/adapter.
IMPORTANT: If using a PoE injector, make sure you are connecting the correct ports. Permanent damage may occur to your switch or network adapter otherwise.
Software Requirements
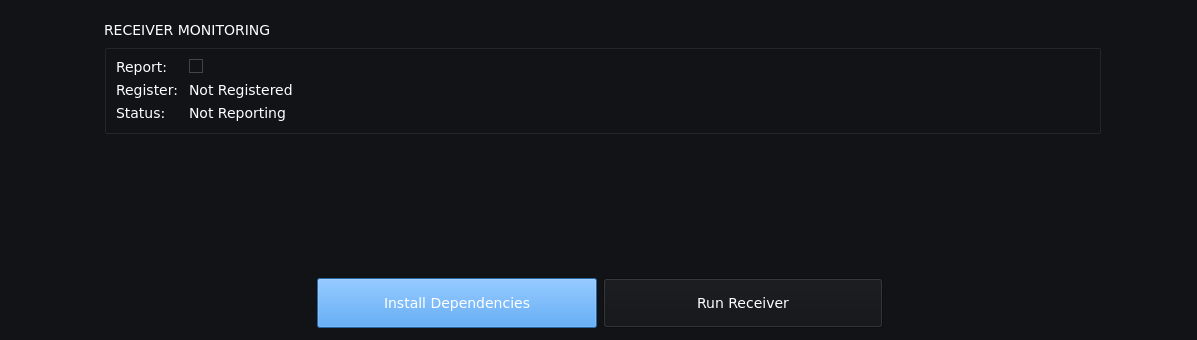
Next, ensure all software prerequisites are installed on your host. If using the GUI, in case some dependencies are missing, click on the “Install Dependencies” button on the Receiver tab, as shown below. If you cannot see the button, all dependencies are already installed correctly.
If using the CLI, run the following command to ensure all dependencies are installed:
blocksat-cli deps install
Note: this step works with the two most recent releases of Ubuntu LTS, Fedora, Debian, and Raspbian. In case you are using another Linux distribution or version, please refer to the compilation instructions.
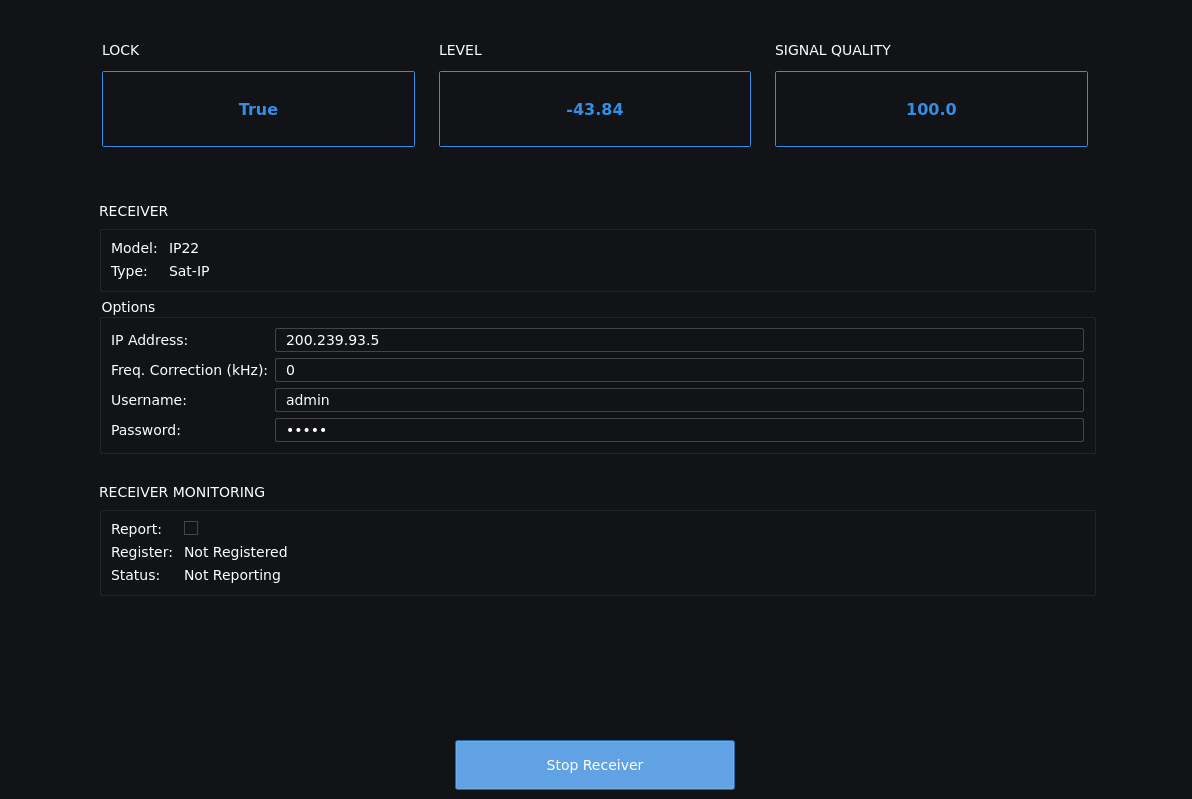
Running
You should now be ready to launch the Sat-IP client. If using the GUI, click on the “Run Receiver” button on the Receiver tab, shown above. After that, you can monitor the receiver in real time, as shown below:
If using the CLI, run the following command to launch the Sat-IP client:
blocksat-cli sat-ip
Note: the Sat-IP client discovers the Sat-IP antenna (the server) via UPnP. If your network blocks this traffic type, you can specify the Sat-IP antenna’s IP address directly using option
-a/--addron the CLI or the IP address field on the GUI. Alternatively, see the troubleshooting section.
Next Steps
At this point, if your antenna is already correctly pointed, you should be able to start receiving data on Bitcoin Satellite. Please follow the Bitcoin Satellite configuration instructions. If your antenna is not aligned yet, refer to the antenna alignment guide.
Further Information
Troubleshooting the Server Discovery
When the Sat-IP client returns the error “Could not find a Sat-IP receiver,” it is possible that either the network or your host is blocking the UPnP traffic used to auto-discover the base station receiver.
To troubleshoot the problem, you can start by inspecting whether the devices in the network are replying to the SSDP packets sent by your host. To do so, open a terminal and run the tcpdump application as follows:
sudo tcpdump -i any port 1900
Typically, a reply will come from your local router, but we also need the response from the Sat-IP server (the base station device). If the base station is not replying, you can try changing the SSDP source port to 1900 and recheck the results on tcpdump. To do so, if using the CLI, run the Sat-IP client as follows:
blocksat-cli sat-ip --ssdp-src-port 1900
If you see the response coming from the base station now, but the Sat-IP client still does not connect to it, your host’s firewall might be blocking the response. If you are on Ubuntu (using ufw), you can allow SSDP responses by running sudo ufw allow 1900. More specifically, it is generally preferable to configure the firewall rule with a reduced scope. For instance, you can enable only the SSDP packets coming specifically from the base station device. If you know the base station’s IP address, you can do so by running:
sudo ufw allow from [base-station-address] to any port 1900
If you don’t know the base station’s IP address at this point, you can allow SSDP packets from any address in the local subnet. For instance, for a 192.168.1.1/24 subnet, run:
sudo ufw allow from 192.168.1.1/24 to any port 1900
More generally, if you are running another Linux distribution or firewall manager, make sure to allow UDP packets sent to port 1900.
Direct Connection to the Base Station
A typical use case for the base station is connecting it to a switch or router and accessing it from hosts within the same network. However, it is also possible to connect the host directly to the base station without intermediate switches or routers. In this case, you need to pay attention to two aspects:
- The network interface that the host shall use when attempting to discover the Sat-IP server automatically.
- The IP address of the chosen interface.
By default, the host will send the device discovery requests via its default network interface (for instance, a WLAN interface). Meanwhile, you may have the base station connected directly to a secondary Ethernet interface. In this case, the discovery packets would never reach the Sat-IP antenna. To solve the problem, specify the network interface that the Sat-IP client should use to send SSDP discovery packets. If using the CLI, you can do so with the --ssdp-net-if command-line option.
Regarding the IP address configuration, note the base station typically would not receive an IP address via DHCP when connected directly to your host. Instead, it will fall back to a link-local address in the 169.254.0.0/16 subnet. Hence, to communicate with the base station, you need to configure your host’s Ethernet interface with an arbitrary address in the 169.254.0.0/16 subnet. For instance, assuming the Ethernet interface is named eth0, run:
ip addr add 169.254.100.50/16 dev eth0
Finally, if using the CLI, run the Sat-IP client with the following command while replacing eth0 with your interface name:
blocksat-cli sat-ip --ssdp-net-if eth0
Running on Docker
A Docker image is available for running the Sat-IP client on a container. Please refer to the instructions in the Docker guide.
Compilation from Source
The Sat-IP setup relies on the TSDuck application, which is installed by the GUI or CLI as part of the software dependencies. However, if you would like to compile TSDuck from source and install it manually, you can do so by following the instructions below.
git clone https://github.com/tsduck/tsduck.git
cd tsduck
build/install-prerequisites.sh
make NOTELETEXT=1 NOSRT=1 NOPCSC=1 NODTAPI=1
sudo make NOTELETEXT=1 NOSRT=1 NOPCSC=1 NODTAPI=1 install
Refer to TSDuck’s documentation for further information.
Prev: Receiver Setup - Next: Bitcoin Satellite or Antenna Pointing