TBS Linux USB Receiver
The TBS 5927 and TBS 5520SE devices are USB-based DVB-S2 receivers. They receive the satellite signal fed via a coaxial interface and output data to the host over USB. They are also configured directly over USB, and the host is responsible for setting such configurations using specific Linux tools.
The instructions that follow prepare the host for driving the TBS receiver.
Table of Contents
- Hardware Connections
- TBS Drivers
- Software Requirements
- Configure the Host
- Launch
- Next Steps
- Further Information
Hardware Connections
The TBS 5927/5520SE should be connected as follows:

- Connect the LNB directly to “LNB IN” interface of the TBS 5927/5520SE using a coaxial cable (preferably an RG6 cable).
- Connect the TBS’s USB 2.0 interface to your computer.
- Power up the TBS device. For the TBS 5927 model, connect the 12V DC power supply. For the TBS 5520SE, connect both male connectors of the dual-male USB Y cable to your host.
TBS Drivers
Next, install the device drivers required to use the TBS 5927 or 5520SE receiver. The installation rebuilds and rewrites the Linux Media drivers. Hence, unless you are setting up a dedicated machine to host the TBS receiver, using a virtual machine (VM) would be safer and recommended. By doing so, the drivers will be installed on the VM instead of your main machine.
When using the GUI, the driver installation starts automatically after clicking the “Install Dependencies” button on the Receiver tab, as shown below:
If using the CLI, run the following command on the host machine (or VM) to install the drivers:
blocksat-cli deps tbs-drivers
Once the script completes the installation, reboot the host.
Software Requirements
Next, ensure all software prerequisites are installed on the host. If using the GUI, in case some dependencies are still missing, click on the “Install Dependencies” button on the Receiver tab, shown above. If you cannot see the button, all dependencies are already installed correctly.
If using the CLI, run the following command to ensure all dependencies are installed:
blocksat-cli deps install
Note: the installation supports the
apt,dnfandyumpackage managers.
Configure the Host
Next, create and configure a network interface to output the IP traffic received via the TBS 5927/5520SE unit. With the GUI, this is done automatically after clicking on the “Run Receiver” button on the Receiver tab, shown above.
With the CLI, you can do so by running the following command:
blocksat-cli usb config
If you would like to review the changes before applying them, append option
--dry-runto the command.
Note the GUI and CLI steps above will define an arbitrary IP address to the interface. However, you could also set a specific IP address if needed.
On the GUI, you can set the specific IP address directly on the Receiver tab before running the receiver. With the CLI, you can define the IP address using option --ip on the usb config command.
Furthermore, note the configuration is not persistent across reboots. After a reboot, you need to run blocksat-cli usb config again. With the GUI, simply start the receiver again after a reboot, and the GUI will repeat the configuration.
Launch
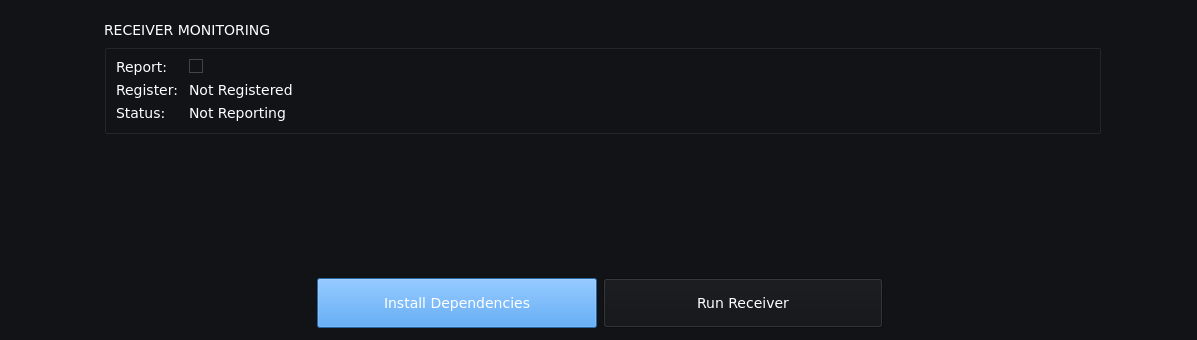
At this point, if using the GUI, the receiver will be started already. Then, you can monitor its status in real time on the Receiver tab, as shown below:

If using the CLI, you need to manually start the receiver by running the following command:
blocksat-cli usb launch
Next Steps
At this point, if your antenna is already correctly pointed, you should be able to start receiving data on Bitcoin Satellite. Please follow the Bitcoin Satellite configuration instructions. If your antenna is not pointed yet, refer to the antenna alignment guide.
Further Information
Docker
A Docker image is available for running the Linux USB receiver host on a container. Please refer to the instructions in the Docker guide.
Useful Resources
Install Binary Packages Manually
The following instructions are an alternative to the automatic installation via the CLI (with command blocksat-cli deps install).
On Ubuntu/Debian:
sudo apt apt update
sudo apt install python3 iproute2 iptables dvb-apps dvb-tools
On Fedora:
sudo dnf update
sudo dnf install python3 iproute iptables dvb-apps v4l-utils
On Fedora, package dvb-apps is not available via the main dnf repository. In this case, you can install it from our repository by running:
sudo dnf copr enable blockstream/satellite
sudo dnf install dvb-apps
If command
dnf copr enableis not available in your system, install packagednf-plugins-core.
Building dvb-apps from Source
Alternatively, you can build dvb-apps from source by running the following commands:
git clone https://github.com/Blockstream/dvb-apps
cd dvb-apps
make
sudo make install
Prev: Receiver Setup - Next: Bitcoin Satellite or Antenna Pointing